

Create Value Sets
How to Create, Save, and Edit Value Sets
The following tutorial supports any Authors who need to create value sets as well as the measure developers and value set developers for the annual updates of the electronic Clinical Quality Measure (eCQM) value sets. This tutorial is useful for other purposes as well, beyond the eCQM value set annual updates.
Before you can create value sets, you need VSAC Authoring Permissions. It is helpful to understand the the roles of value set authors and stewards. NLM expects all authors and stewards to review the VSAC Authoring Best Practices.
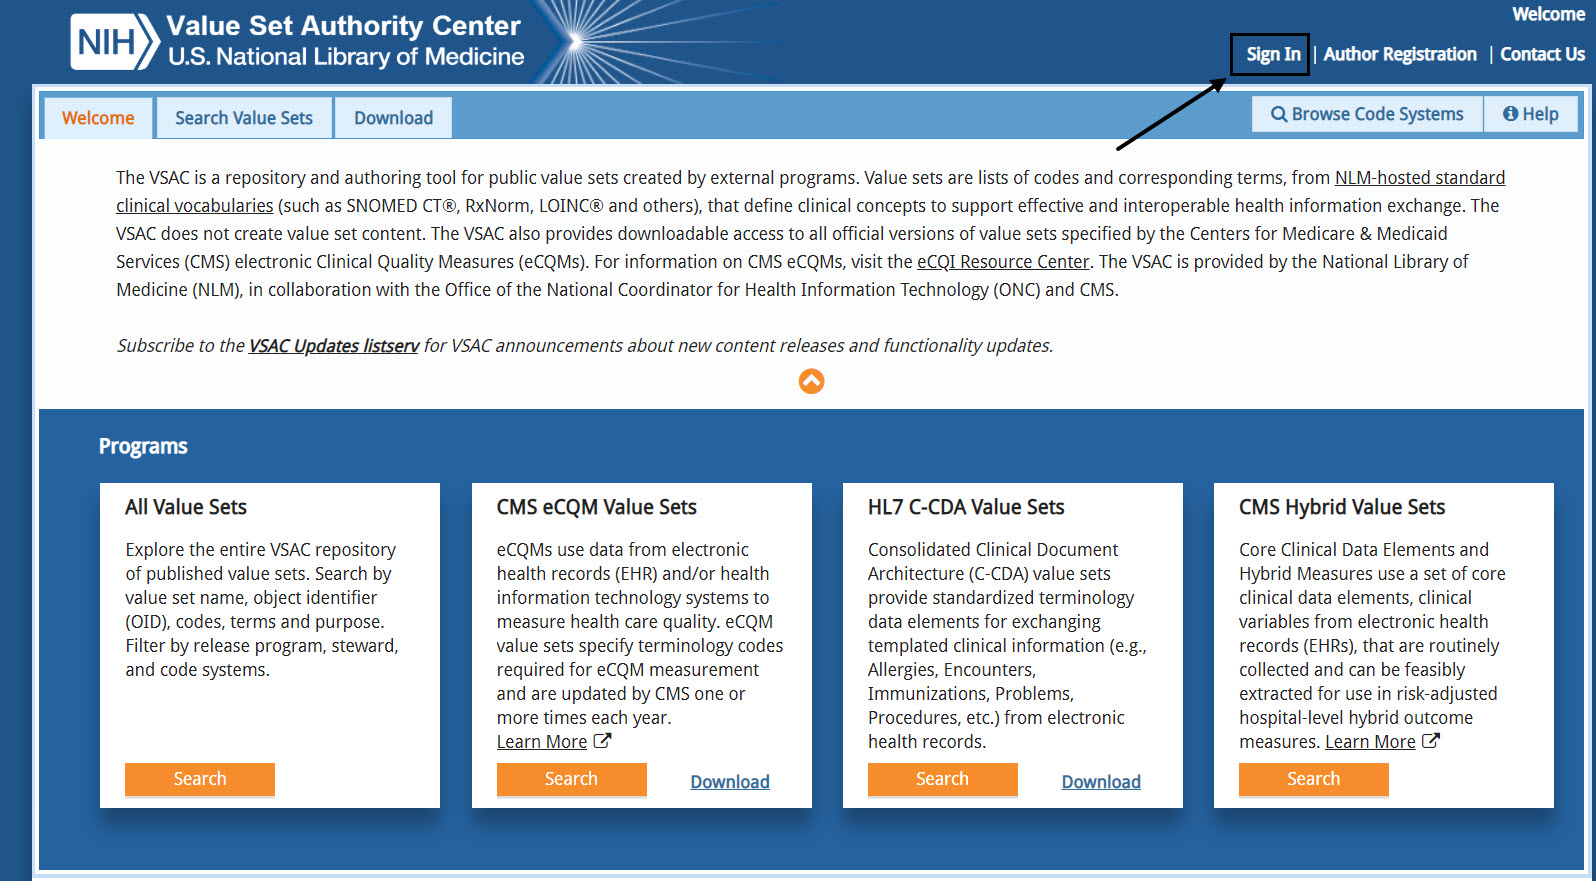
Once you obtain authoring permissions, sign into VSAC with your UMLS account.
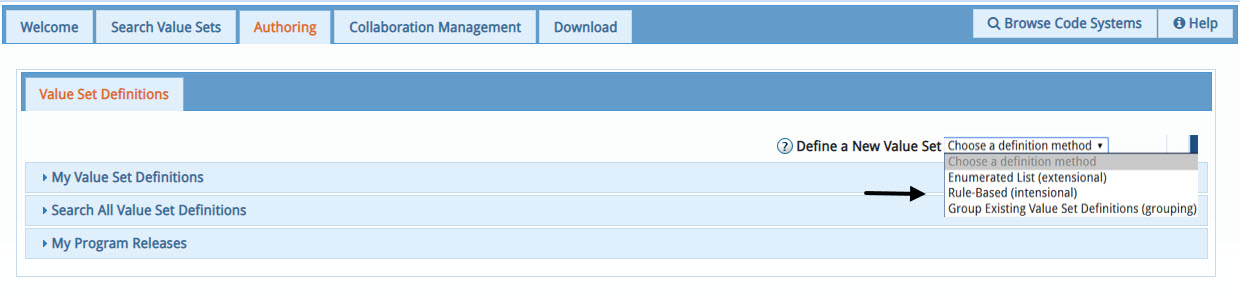
- Select the Authoring tab.
- Select "Enumerated List (extensional)" in the Define a New Value Set drop-down menu.
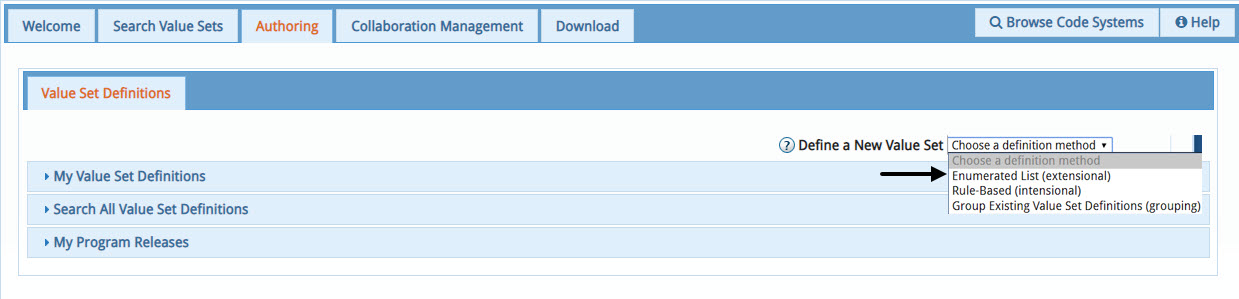
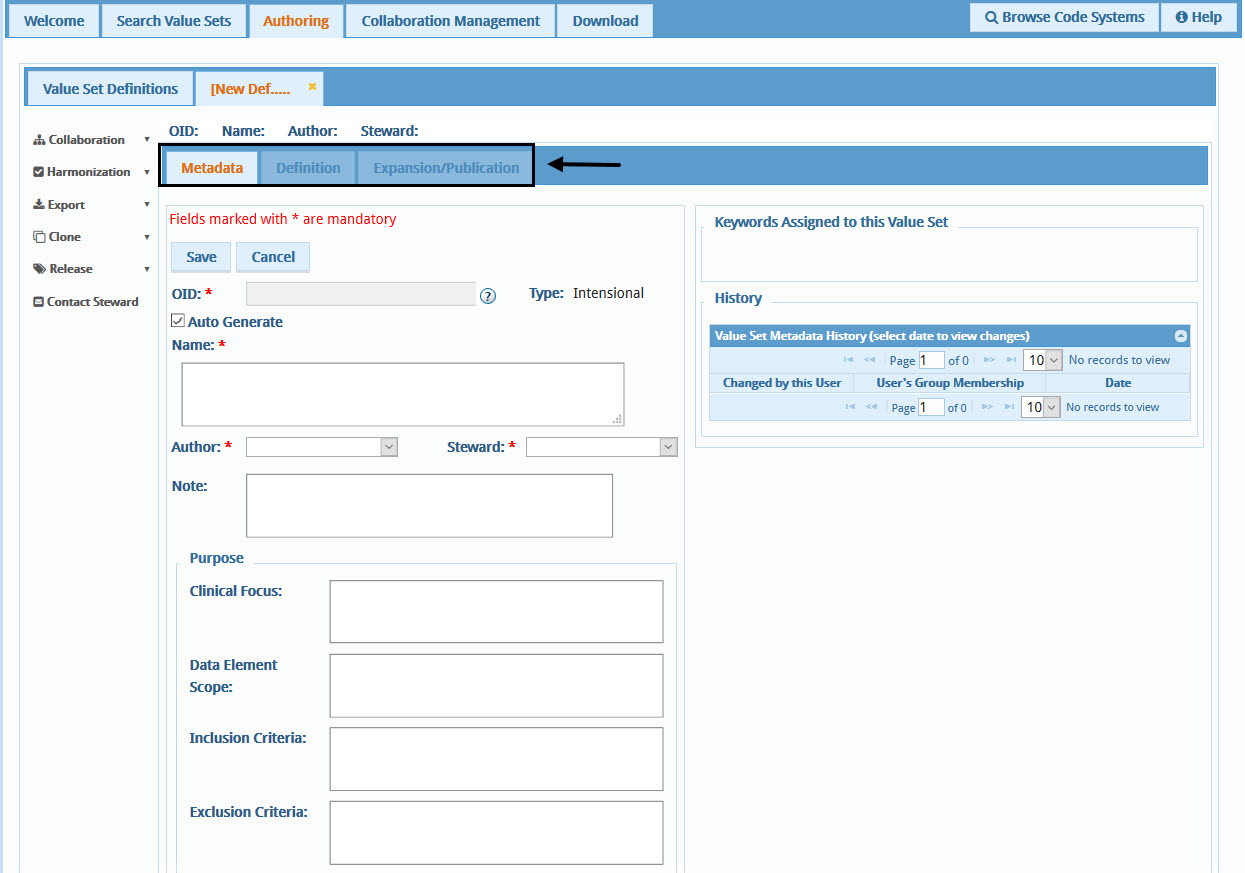
A tab entitled, New Def… appears. Under that tab, there are three sub tabs. Complete the information in each sub tab sequentially.
- Metadata
- Definition
- Expansion/Publication
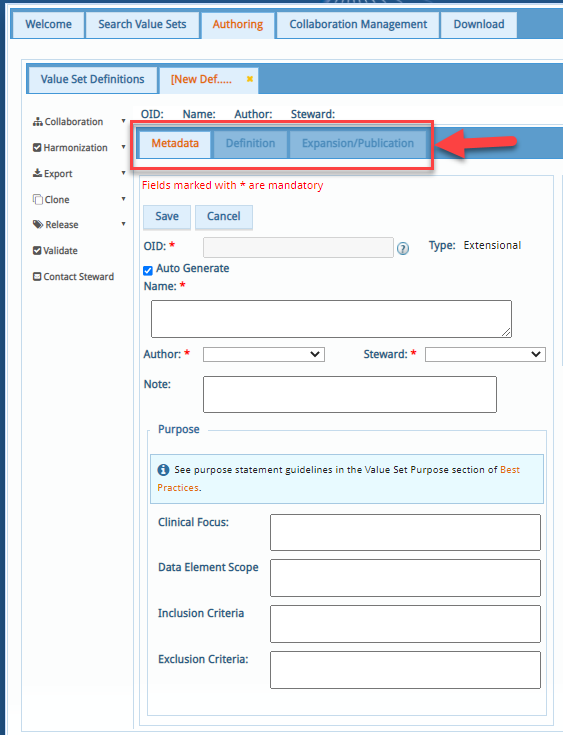
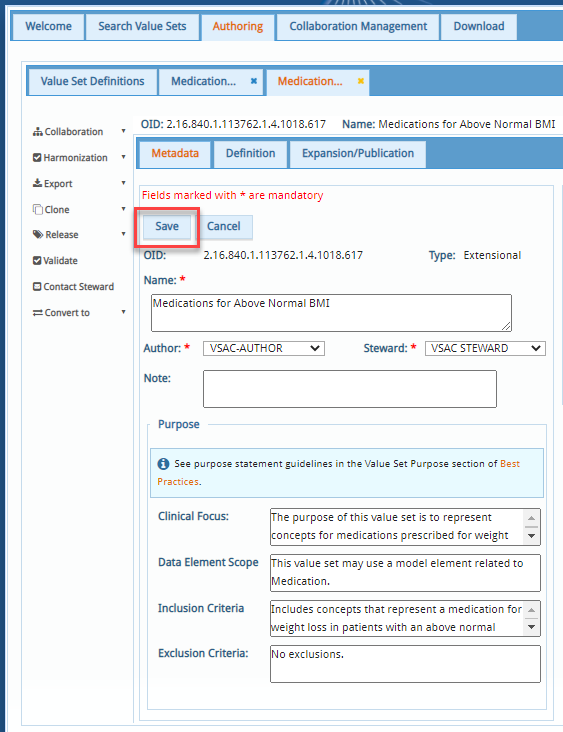
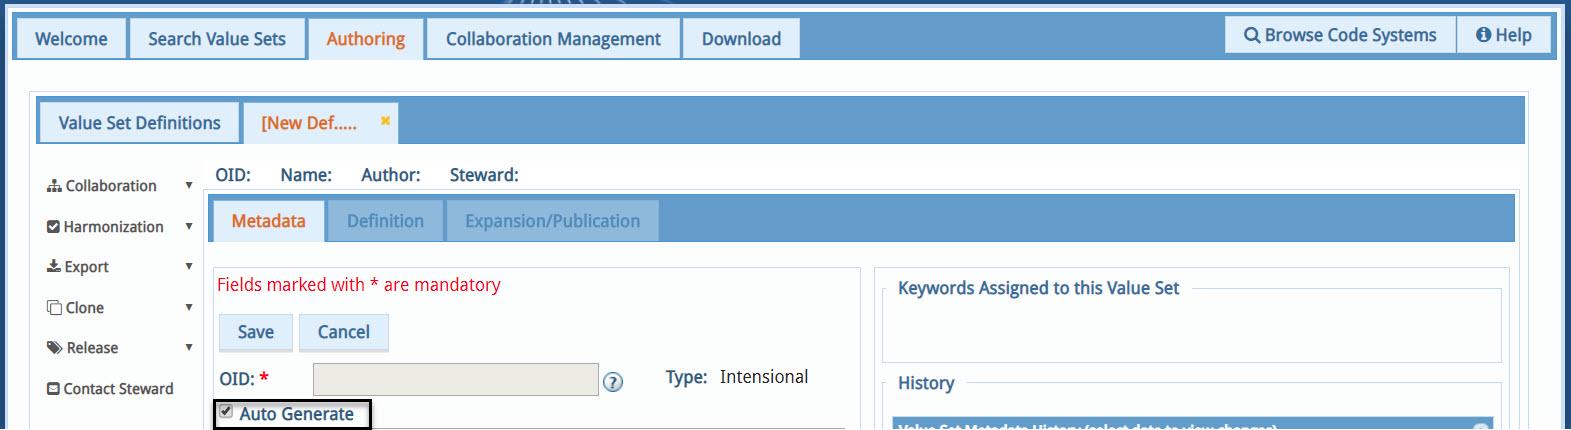
Add Metadata
Mandatory fields : OID, Name, Author, Steward, Purpose Statements
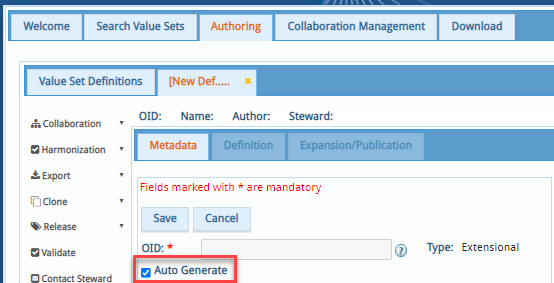
OID
- Object Identifier (OID) Assignment - We strongly encourage the auto generate default setting in which VSAC automatically generates an OID for your value set once you have entered all the information in the other fields, and have selected the "Save" button. If the automatic OID assignment does not meet your purpose, you will need to enter your own OID manually.
- Manual Entry of OID (very rare) - You must first register your organization's
namespace with an OID registry, such as HL7, and your OID must be previously published and used
by
the value set community; the value set you create will have the same content and purpose of your
pre-existing OID. If your OID satisfies these requirements, uncheck the Auto Generate box under
the
OID field and follow these formatting rules:
- OIDs consist of dot-separated digits [1-9] or 0 if a single digit number, leading zeros are not allowed in multi-digit numbers.
- NLM OID name space: Your manually entered OID must not begin with this reserved NLM namespace: 2.16.840.1.113762.1.4.
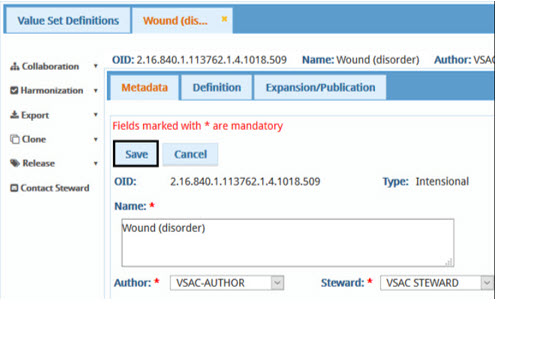
Value Set Name and Purpose Statements
Follow VSAC Authoring Best Practices to write your value set Name and Purpose Statements.
Save
When finished entering metadata, click the "Save" button.
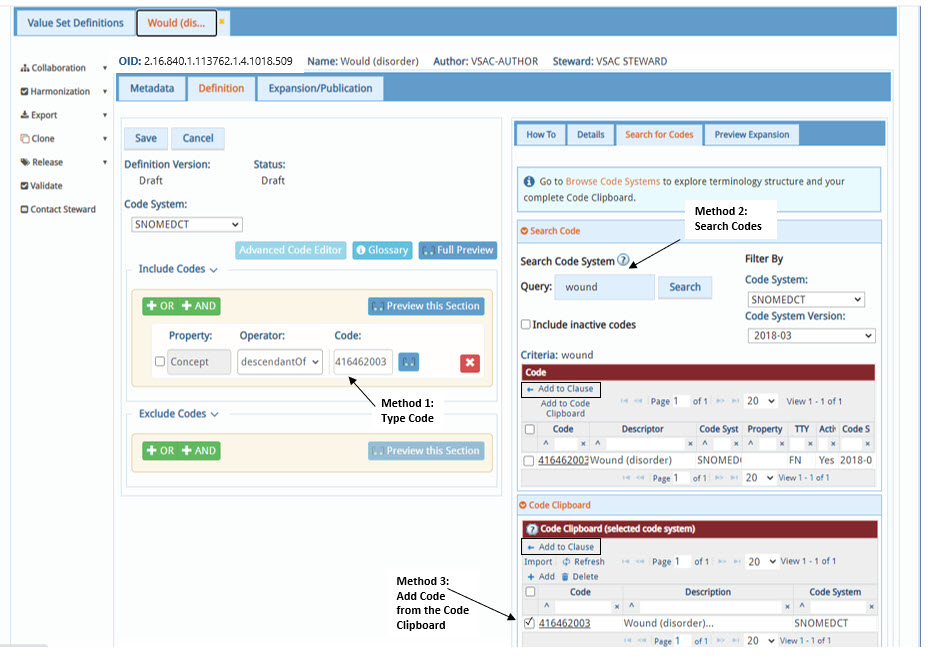
Create Definition
- Select a code system for your value set.
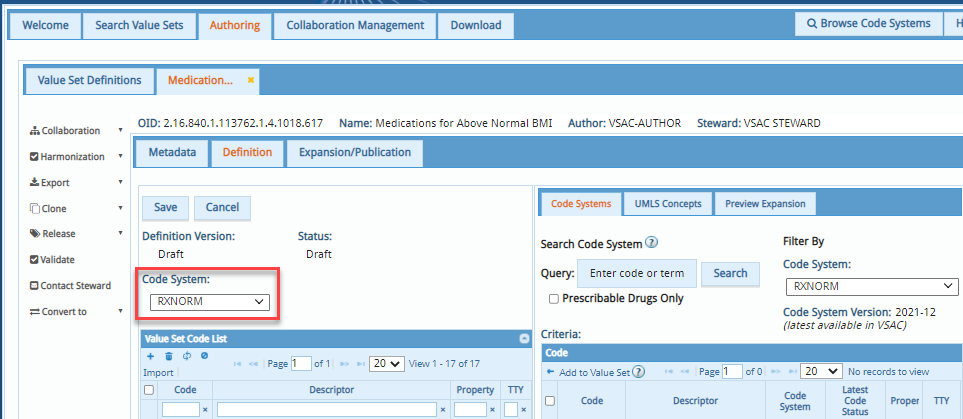
- Add codes to your value set. Methods: SEARCH, IMPORT, ADD(+)
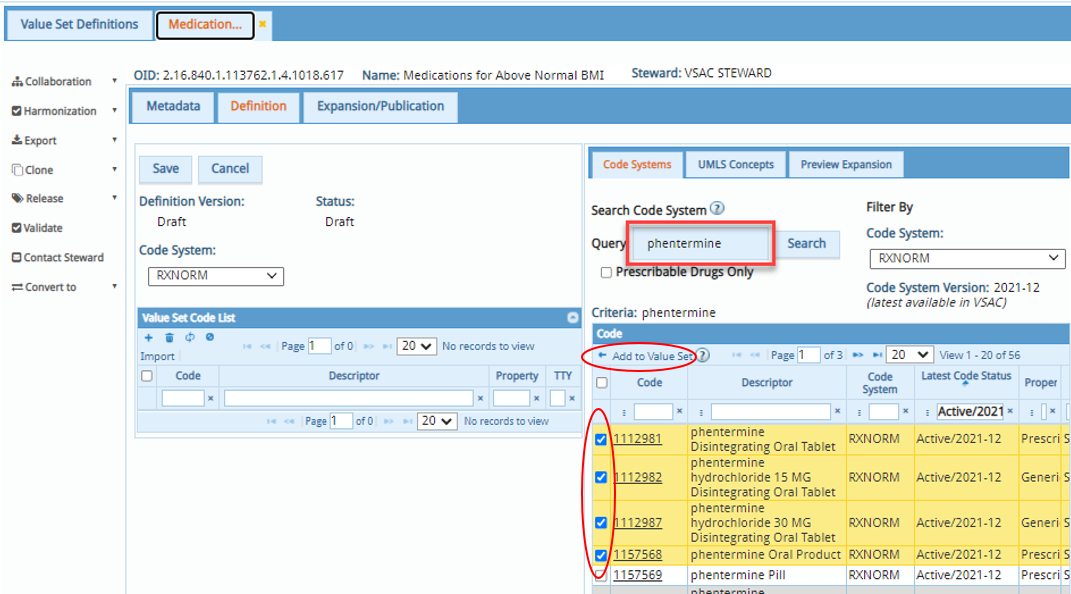
SEARCH- Search and filter for codes in the Code Systems panel.
- Select your desired codes, and click "←Add to Value Set"
- Save.
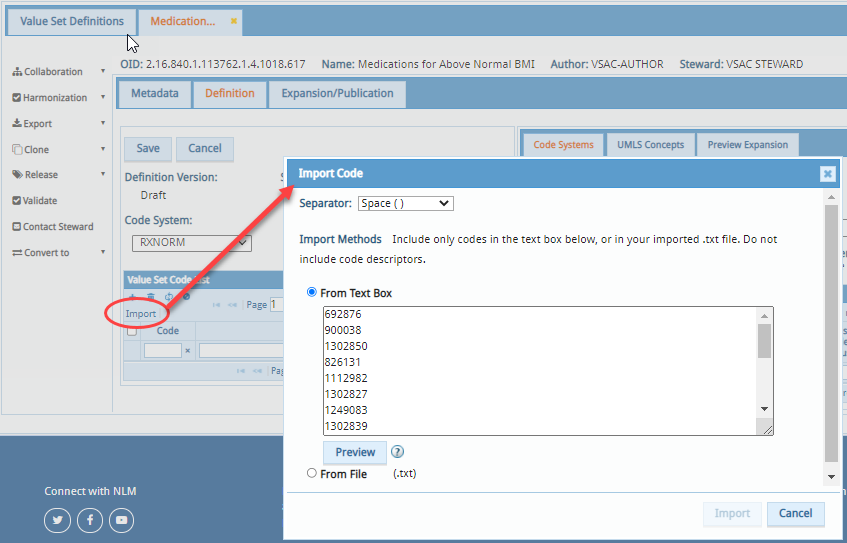
IMPORT- Import a list of codes you have generated elsewhere.
- Click "Import" in the Value Set Code List table.
- Select the character that separates the codes you are copying to the Text Box or in the file you are importing.
- Choose "From Text Box" or "From File". Supported file type is .txt
- Click "Preview": Preview is useful to determine if you selected the correct separator or if you mistakenly included descriptors in your code import. For example, if you import a file with 15 codes separated by space, but you mistakenly selected a ; or | , your Code Preview will display as a single row and total codes: 1
- Click "Validate": Validates and provides information about your code list you wish to import. Removes duplicate codes, shows invalid/inactive codes. Code count difference between Code Preview and Code Validation can indicate issues in your code list. You must validate your codes and ensure you include only valid codes before the Import button will activate.
- Click "Import"
ADD (+)- Click the + in the Value Set Code List table
- Type or paste your code in the yellow-highlighted row
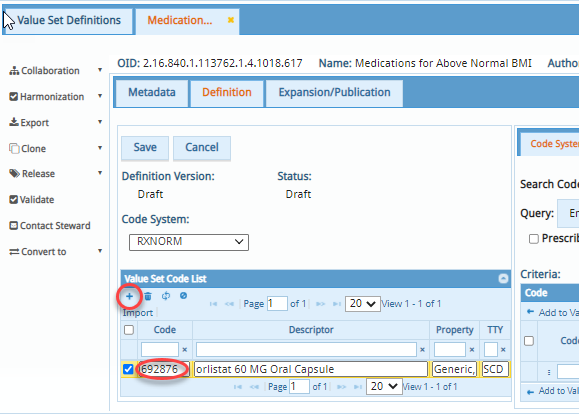
- Click the Submit button to submit your value set to your steward for
approval.
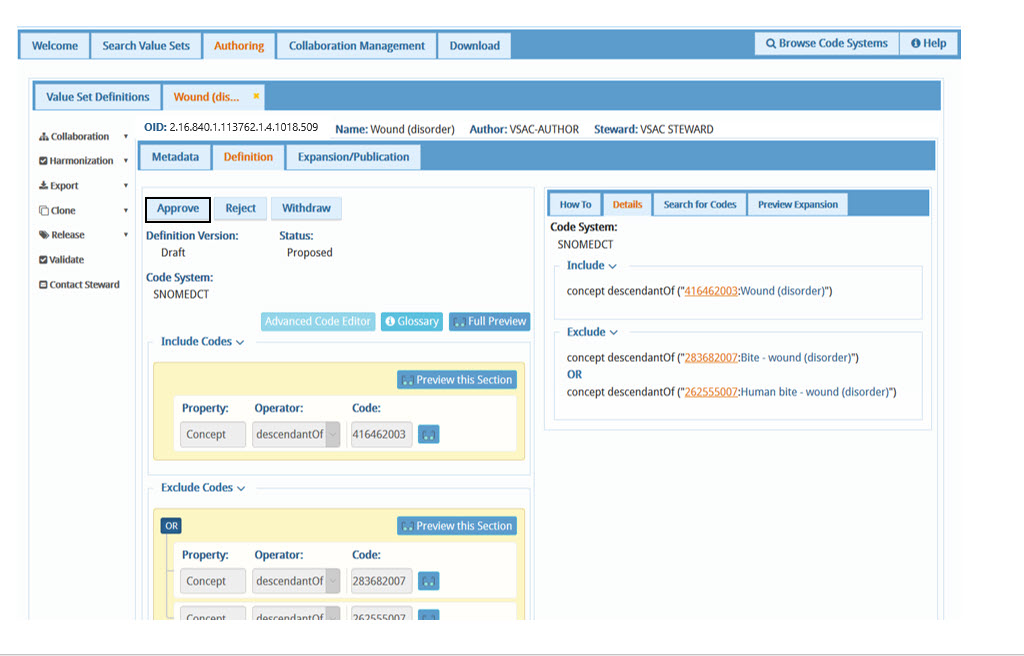
Your steward will review your value set definition and decide to approve or reject the value set
definition.
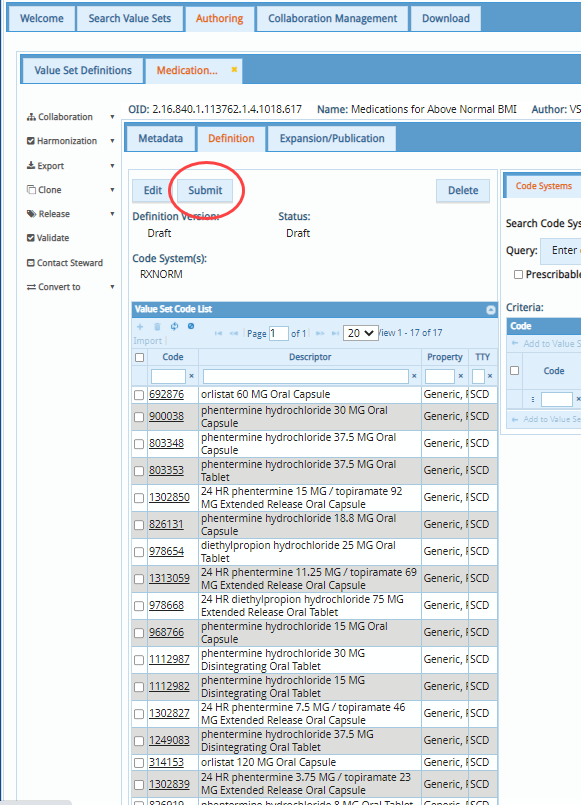
- Click the Approve button. (steward action)
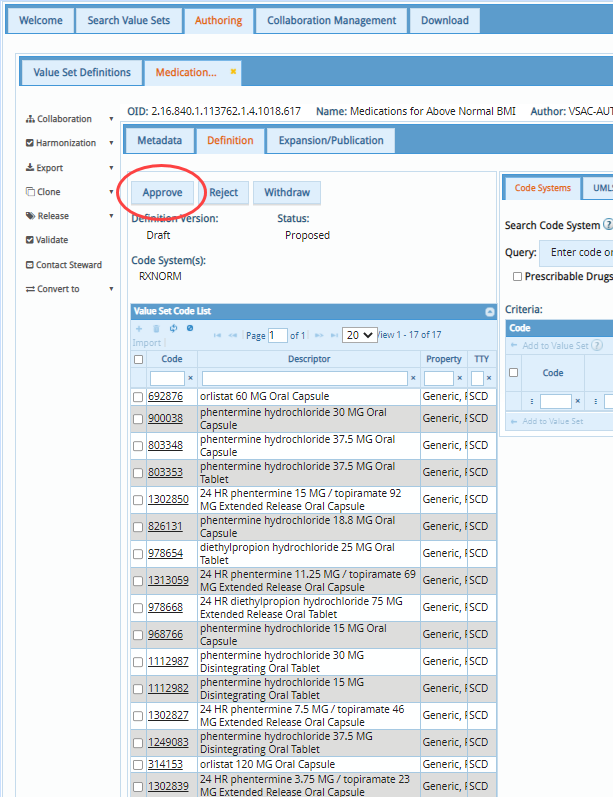
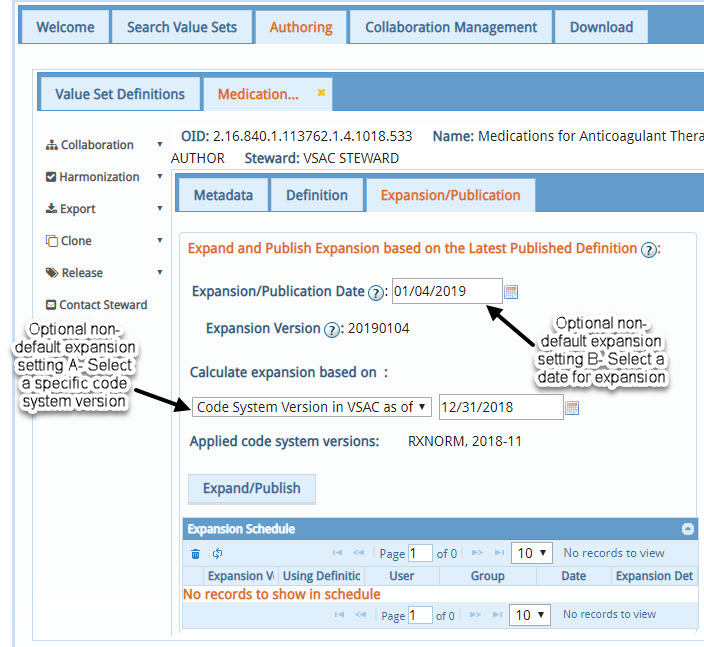
When the steward approves the value set definition, your value set is in Ready to Publish status. VSAC will publish a snapshot/temporary expansion of your definition version, called Latest, at midnight Eastern Time expanded/calculated using the most recent code system versions available in VSAC. VSAC will automatically publish subsequent 'Latest' expansions of your value set definition whenever code systems update in VSAC. If you require a specific type of expansion for your value set, such as a static code list, or based on a later publication date, different code system version, or a pre-established expansion profile, go to the Expand/Publish tab to create a "Steward Expansion."
Expand/Publish Value Set
If you require non-default expansion settings, like a specific code system version (Setting A Example), or a date for expansion (Setting B Example) proceed to the Expansion/Publication sub tab after you have submitted, saved, and you or the steward has approved your value set definition. Make the selections for the non-default expansion settings as illustrated below.
Topics
- Select Intensional Value Set Option
- Add Metadata
- Create Definition
- Code Clipboard
- Expand/Publish the Value Set
- Valid Operators for Each Code System
- CDCREC Example Value Set
- LOINC Filters, Valid Operators, and Example Value Set
Select Intensional Value Set Option
Once you obtain authoring permissions, sign into VSAC with your UMLS account.
- Select the Authoring tab.
- Select the rule-based intensional option in the definition method drop-down menu.
A tab entitled, New Def… appears. Under that tab, there are three sub tabs: Metadata, Definition, and Expansion/Publication. You will need to complete the information in each sub tab sequentially:
- the Metadata sub tab
- the Definition sub tab
- the Expansion/Publication sub tab, if needed
Add Metadata
Mandatory fields : OID, Name, Author, Steward, Purpose fields
OID
- Object Identifier (OID) Assignment - we recommend the auto generate default setting in which VSAC automatically generates an OID for your value set once you have entered all the information in the other fields, and have selected the "Save" button. If the automatic OID assignment does not meet your purpose, you will need to to enter your own OID manually.
- Manual Entry of OID (Rare) - The only case in which you should manually enter your own OID is when you have an established pre-existing OID that you have published in another context external to VSAC and the OID is already used by the community, and the value set you create will have the same content and purpose of the pre-existing OID.
 to correctly
enter your OID before selecting the Save button.
to correctly
enter your OID before selecting the Save button.
- If you need to enter an OID manually, the following rules apply:
- OID Consists of all digits [1-9] or 0 if a single digit number, but no leading zeros if multiple digit number
- Numbers may be separated by dots
- NLM OID name space: Any OID entered MUST NOT start with 2.16.840.1.113 762.1.4
Purpose fields
Follow VSAC Authoring Best Practices to write your purpose statements.
Save
When finished entering metadata, click the "Save" button.
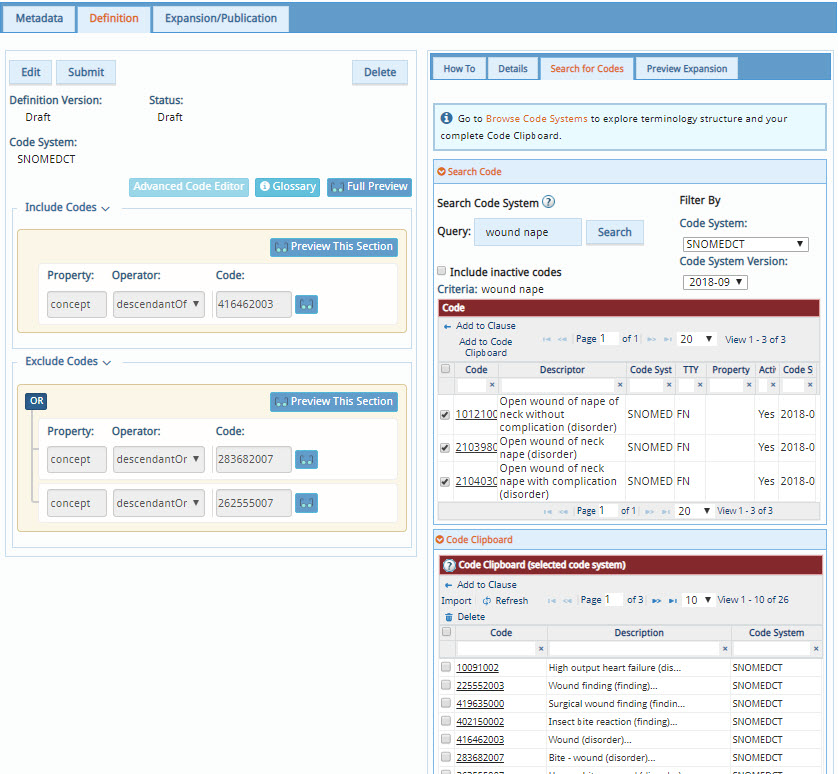
Create Definition
- Select a code system for your value set.

- Get codes for your Include and Exclude clauses.
- If you already know a code you want to include, type (Method 1) or copy/paste the code into a clause. Alternatively, if you have already collected your codes in a local text file, you can import your codes into the Code Clipboard as a holding place for you to then select which codes go into which clause.
- If you know you need to use descriptors to find codes, you can either use "Search for Codes" (Method 2), as a simple and direct search and filter function, or you can use Browse Code Systems if you need to first study your terminology’s hierarchy and relationship details, and then select codes based on your discovery. Browse Code Systems will open in a separate tab or window depending on your browser settings.
- Add your desired codes to your Code Clipboard (Add to Code Clipboard), or directly add
your
code into your checkbox-selected clause (Method 3) when you use the simple "Search Code"
or
the more advanced Browse Code Systems. Your Code Clipboard is a temporary place for you
to
gather multiple codes to later include them in specific definition clauses. This
separate
Code Clipboard becomes especially important when you are gathering several codes for
multiple clauses as it gives you control over which codes you specify for your clauses
within your value set definition.
- Create your logical clauses. You can do this either before or after you get your codes (step 2).
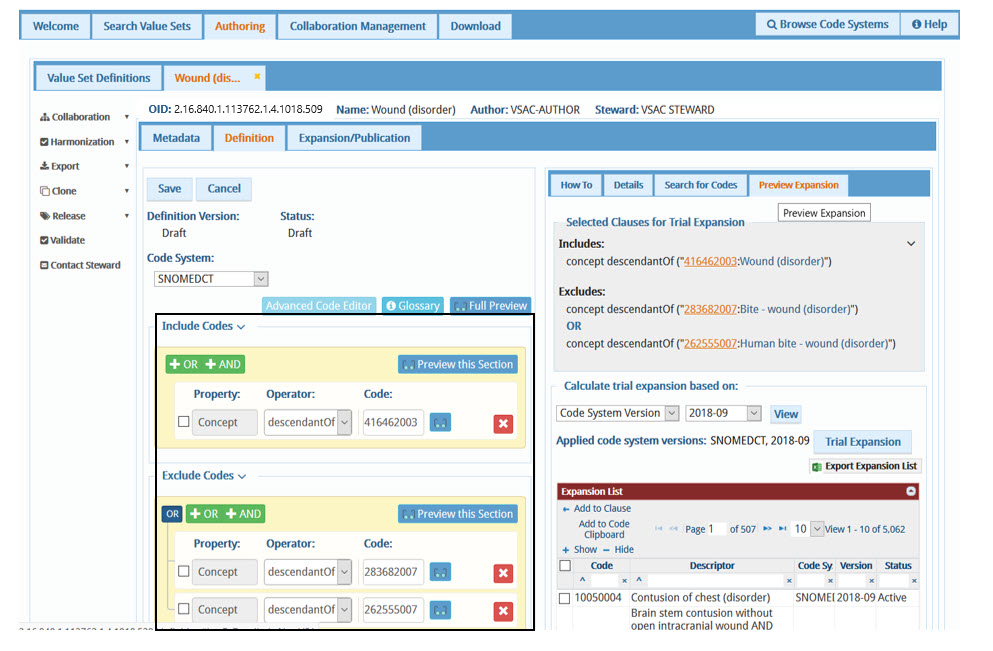
- Select your desired operator and code for your first clause, in either the Include or Exclude Codes sections. See the blue button Glossary to review the function of each operator.
- Add more clauses to create unions (+OR) or intersections (+AND) of your codes.
- If you already know a code you want to include, type or copy/paste the code into a clause. Otherwise, to enter a code from your Code Clipboard into a specific clause, select the checkbox of the clause you want to modify, then select the checkbox of the code in your Code Clipboard, and then select Search Code "Add to Clause".
- If you need to do advanced code editing within your Code Clipboard for a clause, for example, if you are working with the IN operator, select the checkbox of your desired clause, and then click the blue button "Advanced Code Editor".
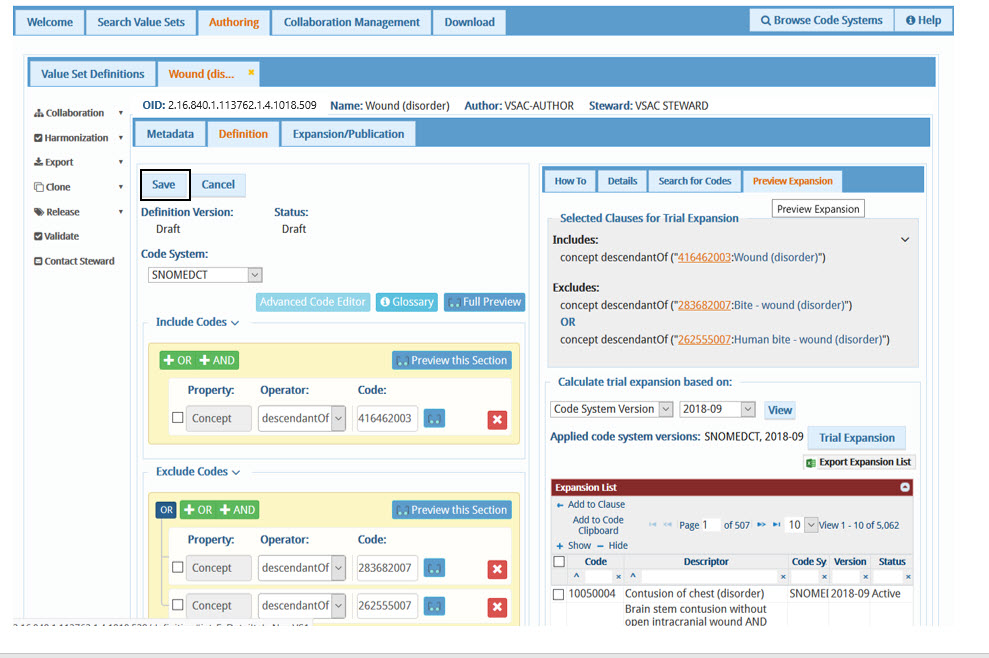
- When you are satisfied with your value set definition, save your value set definition, by
clicking
the Save button.
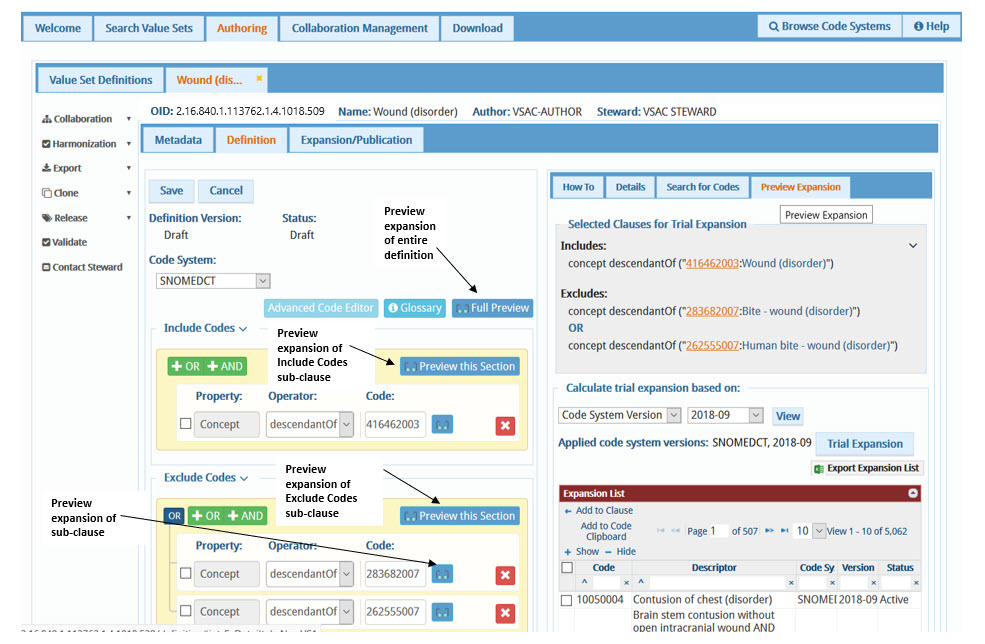
- Preview expansion of your entire constructed definition by selecting the “Full Preview†button,
or of
any sub-clause within the definition by selecting the “Preview this Section to review the
results
of your expanded code list.
- Submit your value set to the steward to approve, by clicking the Submit
button.
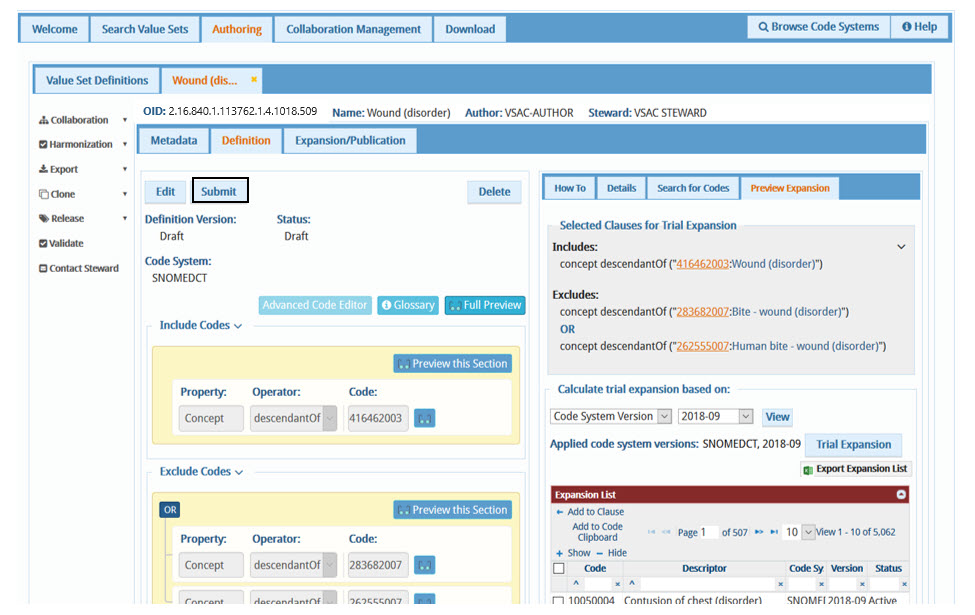
- The Steward will review the value set definition and decide to approve or reject your value set
definition. To approve the value set definition and to enable public access of the value set’s
expansion, the Steward should click the Approve button.
Code Clipboard
Your Code Clipboard is a temporary place for you to gather multiple codes so you can later include them in specific definition clauses. Code Clipboard becomes especially important when you are gathering several codes for multiple clauses as it gives you control over which codes you specify for your clauses within your value set definition. Code Clipboard is currently available to assist you with intensional value set definitions.
You can find your Code Clipboard in three places within the VSAC Authoring environment: the "Search for Codes" tab, "Browse Code Systems," and the "Advanced Code Editor."
Search for Codes tab
Displays your gathered codes only from your currently selected code system.
You can gather more codes from the Search Code panel: select the checkboxes of codes you like and then click Add to Code Clipboard. You can also use the Import feature to import your own local text file of codes into your Code Clipboard.
Add to Clause: select the checkboxes of Code Clipboard codes you need for a specific clause, select the checkbox of that clause, and then click Add to Clause at the top of your Code Clipboard.
Browse Code Systems
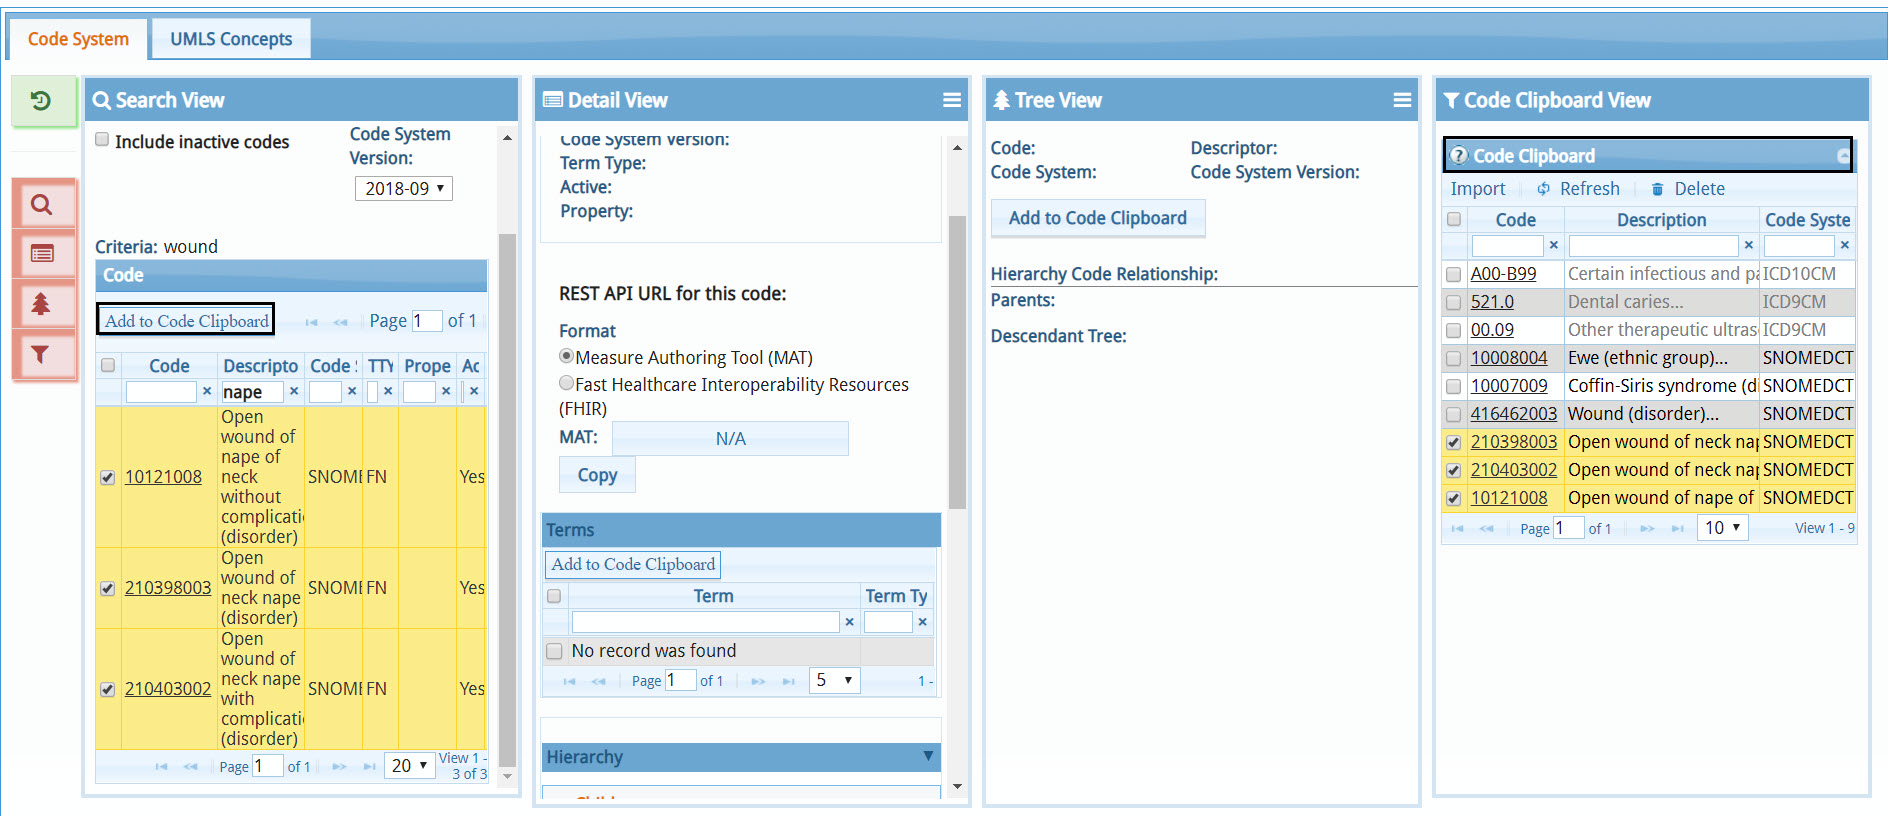
Displays all of your gathered codes from all code systems. Only those codes from the code system with which you are currently working will be selectable; codes you have gathered previously from other code systems will be greyed out.
You can gather more codes from any of the Browse Code System panels: select the checkboxes of codes you like and then Add to Code Clipboard. You can also use the Import feature to import your own local text file of codes into your Code Clipboard.
Your Code Clipboard will persist when you switch back to your VSAC Authoring window, where you can select the checkboxes of codes you like, select the checkbox of your target clause, and then click Add to Clause.
Advanced Code Editor
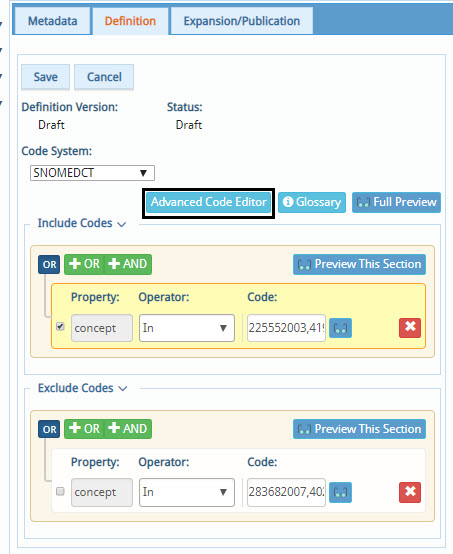
Use the Advanced Code Editor to add more codes to your clause.
Select the checkbox next to the clause for which you would like to add codes, and then select the Advanced Code Editor button.
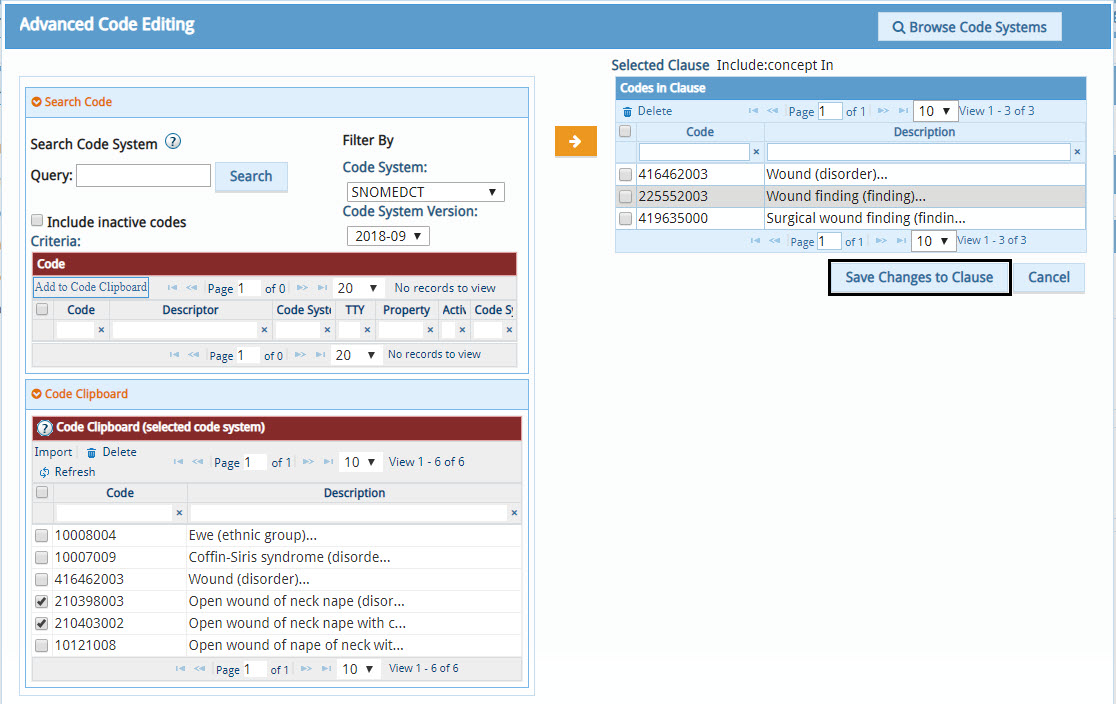
Displays your gathered codes only from your currently selected code system.
You can gather more codes from the Search Code panel within the Advanced Code Editor: select the checkboxes of codes you like and then click Add to Code Clipboard.
You can select the checkboxes of any of your Code Clipboard codes and then click the centrally located orange arrow to place those codes into your selected clause. Then click the [Save Changes to Clause] button, click the Cancel button to close the Advanced Code Editing dialog window and return to your intensional value set definition to see your changes.
Expand/Publish Value Set
If you require non-default expansion settings, like a specific code system version (Setting A Example), or a date for expansion (Setting B Example) proceed to the Expansion/Publication sub tab after you have submitted, saved, and you or the steward has approved your value set definition. Make the selections for the non-default expansion settings as illustrated below.
Valid Operators for Each Code System
This table displays the valid operators for each code system. The "all" operator can be used in just a few smaller code systems (CDCREC, CVX, HL7, HSLOC, NUCCPT, and SOP). Large code systems like SNOMED CT, CPT, etc. are either too large to use all codes or have copyright restrictions.
| Code Systems | all | equal | in | descendantOf | descendantOrSelfOf | childOf | ancestorOf | ancestororSelfOf | parentOf | leafOf |
|---|---|---|---|---|---|---|---|---|---|---|
| All concepts in the code system | The specified concept | All concepts in the specified concept list | All descendants of the specified concept | All descendants of the specified concept plus the specified concept itself | All children of the specified concept | All ancestors of the specified concept | All ancestors of the specified concept plus the specified concept itself | All parents of the specified concept | Terminal descendant codes of the specified header code; excludes header codes that are descendants of the specified header code | |
| CDCREC | x | x | x | x | x | x | x | x | x | |
| CDT | x | x | x | x | x | x | x | x | x | |
| CPT | x | x | x | x | x | x | x | x | x | |
| CVX | x | x | x | |||||||
| HCPCS | x | x | ||||||||
| HL7 | x | x | x | x | x | x | x | x | x | |
| HSLOC | x | x | x | |||||||
| ICD10CM | x | x | x | x | x | x | x | x | x | |
| ICD10PCS | x | x | ||||||||
| ICD9CM | x | x | x | x | x | x | x | x | x | |
| LOINC | x | x | ||||||||
| MED-RT | x | x | x | x | x | x | x | x | ||
| NCI | x | x | x | x | x | x | x | x | ||
| NDFRT | x | x | x | x | x | x | x | x | ||
| NUCCPT | x | x | x | |||||||
| RxNorm | x | x | ||||||||
| SNOMED CT | x | x | x | x | x | x | x | x | ||
| SOP | x | x | x | x | x | x | x | x | x | |
| UCUM | x | x | x | |||||||
| UNII | x | x |
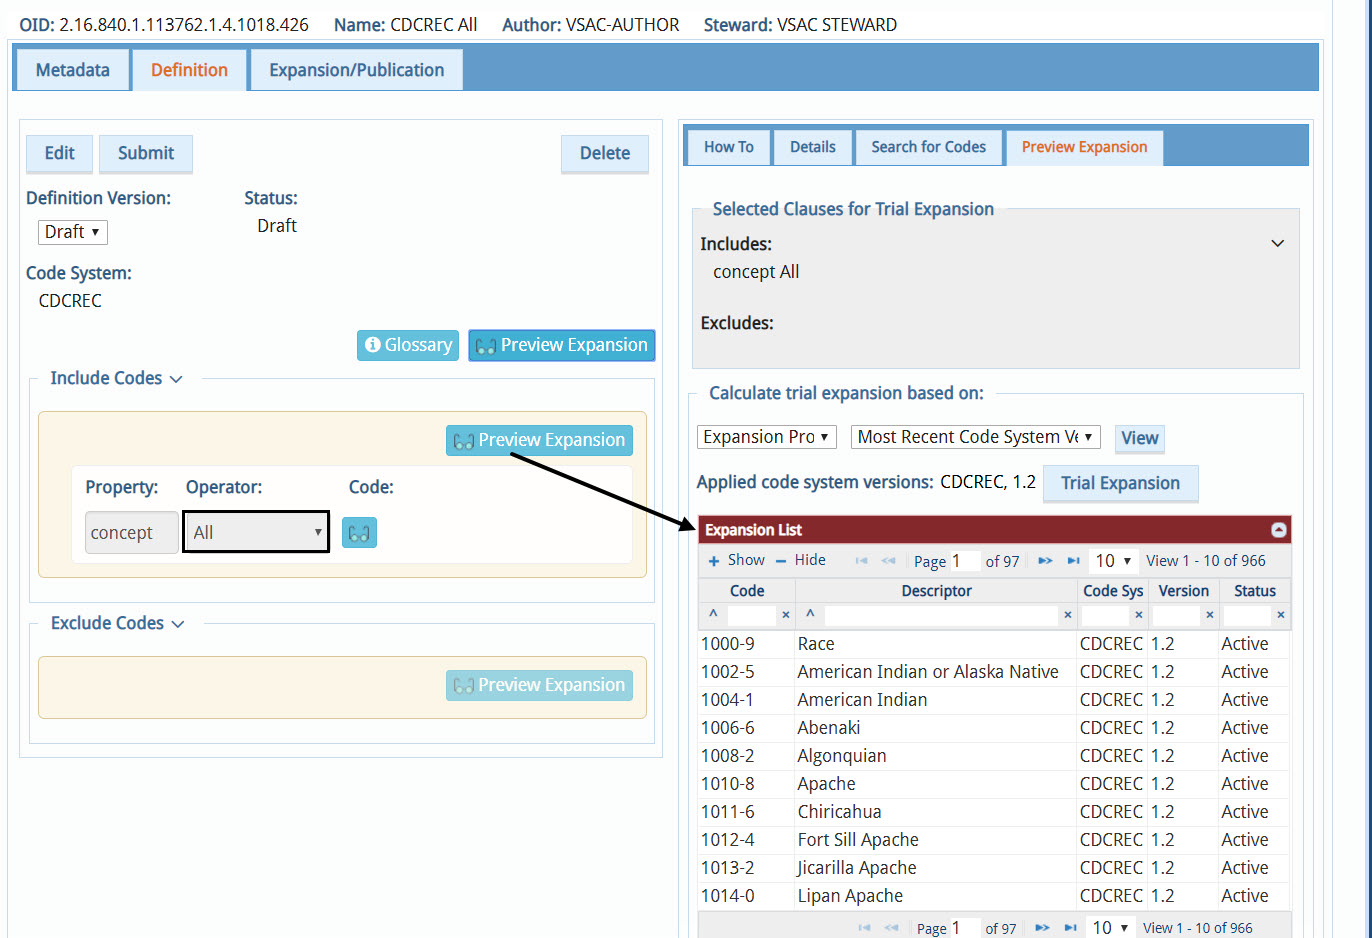
CDCREC Example Value Set
All direct descendants (children) of Race as illustrated in the image below.
- Code System: CDCREC
- Include: childOf 1000-9

All codes in the CDCREC terminology as illustrated in the image below.
- Code System: CDCREC
- Include: All (to get 966 codes)
LOINC Filters, Valid Operators, and Example Value Set
Create logical definitions using Logical Observation Identifiers Names and Codes (LOINC). Use the VSAC property filters in the include and exclude clauses to create an intensional value set:
Class
- Class - Ex: ADMIN, CARD.US, DENTAL
- Type - Ex: Lab, Clinical, Attachment, Survey
Valid Operators for LOINC Filter - Class
| Filter - Class | Operator - equals | Operator - in |
|---|---|---|
| Class | X | X |
| Type | X |
Parts
- Component – Ex: Sodium, Body Weight
- Method – Ex: Confirm, IB, Manual count
- Property – Ex: Type, Ratio, Num
- Scale – Ex: Qn, Nom, Nar
- System – Ex: WBC, Ear, Bld
- Timing – Ex: Pt, 24H, 3H
Valid Operators for LOINC Filter - Parts
| Filter - Parts | Operator - equals | Operator - in |
|---|---|---|
| Component | X | X |
| Method | X | X |
| Property | X | X |
| Scale | X | X |
| System | X | X |
| Timing | X | X |
Other
- Concept – Ex: 4548-4,100040-5,100039-7
- Order/Observation – Ex: Order, Observation, Both, Subset
- Status – Ex: Active, Discouraged, Trial
Valid Operators for LOINC Filter - Other
| Filter - Other | Operator - equals | Operator - in |
|---|---|---|
| Concept | X | X |
| Order/Observation | X | |
| Status | X |
LOINC Example Value Set
LOINC Property Filters are illustrated in the image below.

Once you obtain authoring permissions, sign into VSAC with your UMLS account.
- Select the Authoring tab.
- Select the Group Existing Value Set Definitions (grouping) option in the Define a New Value Set drop-down menu.
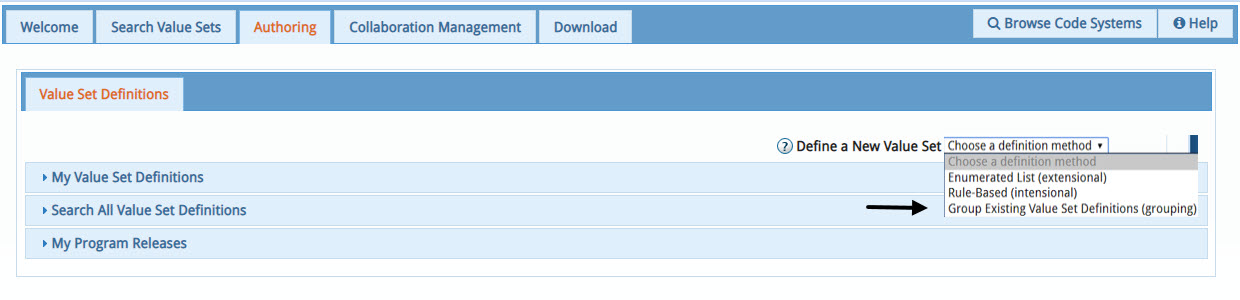
A tab entitled, New Def… appears. Under that tab, there are three sub tabs: Metadata, Definition, and Expansion/Publication. You will need to complete the information in each sub tab sequentially:
- Metadata sub tab
- Definition sub tab
- Expansion/Publication sub tab, if needed
Add Metadata
Mandatory fields : OID, Name, Author, Steward, Purpose fields
OID
- Object Identifier (OID) Assignment - we recommend the auto generate default setting in which VSAC automatically generates an OID for your value set once you have entered all the information in the other fields, and have selected the "Save" button. If the automatic OID assignment does not meet your purpose, you will need to to enter your own OID manually.
- Manual Entry of OID (Rare) - The only case in which you should manually enter
your
own OID is when you have an established pre-existing OID that you have published in another
context
external to VSAC and the OID is already used by the community, and the value set you create will
have the same content and purpose of the pre-existing OID.
- To manually enter your pre-existing OID, uncheck the Auto Generate box under the OID
field,
and follow the instructions in the tool tipto
correctly
enter your OID before selecting the Save button.
- If you need to enter an OID manually, the following rules apply:
- OID Consists of all digits [1-9] or 0 if a single digit number, but no leading zeros if multiple digit number
- Numbers may be separated by dots
- NLM OID name space: Any OID entered MUST NOT start with 2.16.840.1.113 762.1.4
- To manually enter your pre-existing OID, uncheck the Auto Generate box under the OID
field,
and follow the instructions in the tool tip
Purpose fields
Follow VSAC Authoring Best Practices to write your purpose statements.
Save
When finished entering metadata, click the "Save" button.

Create Definition
- Search for and select value sets you would like to group together into your grouping value
set.

- Enter OIDs, value set names, or terms to search for value sets.
- Add selected value sets your grouping value set.
- Save the value set definition.
- Submit your value set to the steward to approve by clicking the Submit
button.
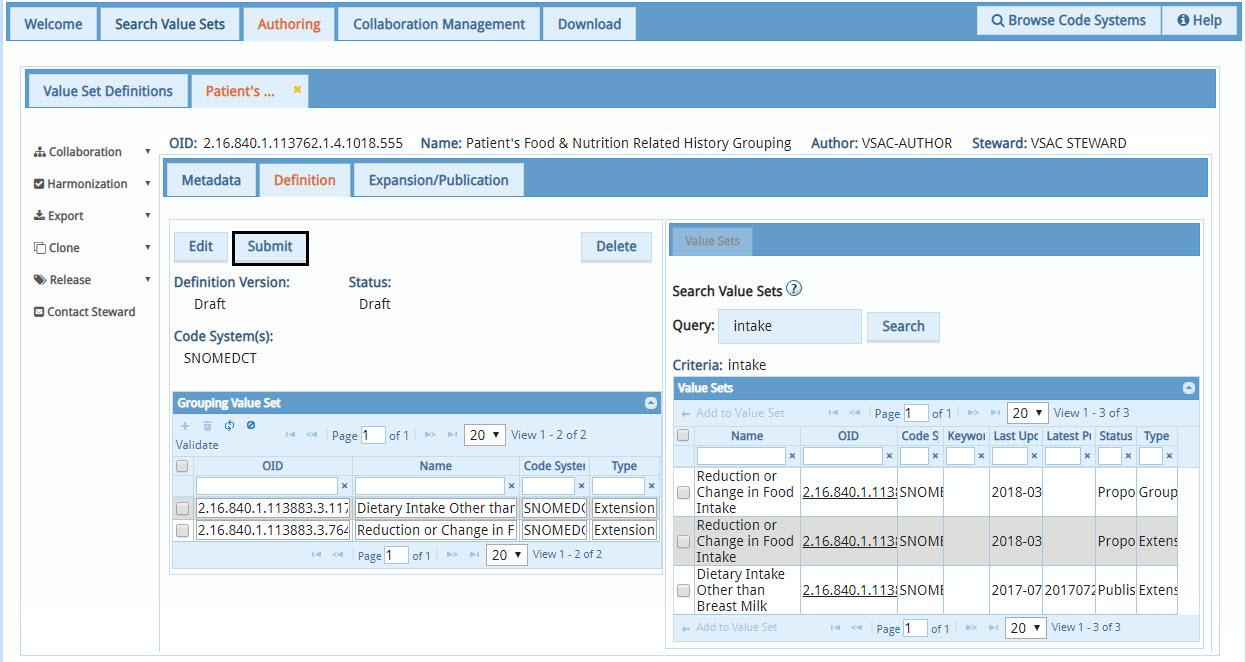
- The steward will review the value set defintion and decide to approve or reject your value set.
To
approve the value set definition and to enable public access of the value set’s expansion, the
Steward should click the Approve button.

When the steward approves the value set definition, your value set is in Ready to Publish status. At midnight (EST), VSAC will publish a snapshot/temporary expansion of the definition, called Latest, based on the most recent code systems available in VSAC.
Expand/Publish Value Set
If you require non-default expansion settings, like a specific code system version (Setting A Example), or a date for expansion (Setting B Example) proceed to the Expansion/Publication sub tab after you have submitted, saved, and you or the steward has approved your value set definition. Make the selections for the non-default expansion settings as illustrated below.

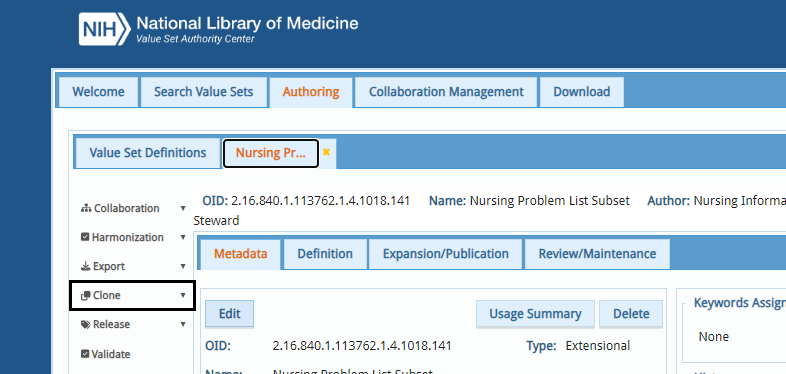
You can use the Clone function, in Authoring, if you find a published or draft value set that is close to what you want to use, but you want to revise it in some way for a new purpose. Your cloned value set will have a new value set OID. (Note: You may not use Clone for updating published value sets. Please refer to Updating Value Sets.)
Last Reviewed: August 29, 2025